
Se encuentra usted aquí
Metalurgia, forja y fundicion
An old noobi.
71 and building my first foundry oven. At this point I am actually still acquiring the needed items for my melting furnace. As I only need to melt aluminum and some copper for alloying aluminum-bronze for now I am going cast-able cement and perlite with a 1 to 2 inch kaowool backing. If I decide down the road that I need to cast iron I will more than likely just build an upgraded iron melter. Anyway a little about me. I have a roughly
30 x 70 pole barn machine shop. Am not a machinist but...
An old noobi.
30 x 70 pole barn machine shop. Am not a machinist but...
An old noobi.
Categorías: Metalurgia, forja y fundicion
Cuchillo Facherito
Hola!
Espero que se encuentren bien.
Les dejo esté trabajo que he terminado en el día de hoy.
Una herramienta de diseño infalible, liviana y fiable.
Especificaciones:
-Acero: 1095
-Largo total: 18,8 cm
-Largo de hoja: 8,7 cm
-Largo de empuñadura: 10,1 cm
-Grosor: 4 mm
-Peso: 114 g
-Material de empuñadura: Guayubira, separadores plásticos y bronce
Vídeo:
Imágenes:
Espero que les guste!
Categorías: Metalurgia, forja y fundicion
C-clamp thumb screw
I got a request from a friend to make a couple dozen thumb nuts(?) that he can fit to various c-clamps. I didn't ask him too many questions about his application yet. (He's an old tradesman and knows what he wants. He's 88 and has probably forgotten more than I'll ever know.)
He wants them 3 inches long and with enough beef in the center to drill various sized holes for different sized clamp screws. Shaped like a "butterfly". I'm picturing something like this.
View attachment 18259 ...
C-clamp thumb screw
He wants them 3 inches long and with enough beef in the center to drill various sized holes for different sized clamp screws. Shaped like a "butterfly". I'm picturing something like this.
View attachment 18259 ...
C-clamp thumb screw
Categorías: Metalurgia, forja y fundicion
Self aspirating burner not working ?
I have a few burners which I use with forced air and that works awesome. But I see some Youtubers (e.g. BigstackD) have a burner without any forced air and uses natural aspiration and yet gets very hot (> 1300 C).
So I tried making a similar 'bell' and testing it by holding the 'bell' (yes the brass one really sounds like a bell) at the air input of the burner, but there was no difference at all :-(
What am I doing wrong ?...
Self aspirating burner not working ?
So I tried making a similar 'bell' and testing it by holding the 'bell' (yes the brass one really sounds like a bell) at the air input of the burner, but there was no difference at all :-(
What am I doing wrong ?...
Self aspirating burner not working ?
Categorías: Metalurgia, forja y fundicion
3D Printed Pattern and Core Box
Thought I'd share a pattern and core box that I've been working on (slowly) over the past 6 weeks or so. It is a decorative dome/cover for the safety valves on a 7 1/4" gauge live steam locomotive. The original part was too small for the boiler (as it was built) so a slightly larger casting is needed. The complicated part was the fact that the boiler on this particular engine is angled so the curves are different on the "front" and "back" sides of the dome. This proved to be quite difficult...
3D Printed Pattern and Core Box
3D Printed Pattern and Core Box
Categorías: Metalurgia, forja y fundicion
Cambio de hoja a antigua buck 112 two dot
Buenas, hace unos años que tenia una viejita buck 112 two dot por el "cajón desastre" , es del primer modelo con los característicos cantos a 90grados , el caso es que tenia la hoja tan gastada que no había manera de hacer nada por ella salvo cambiarla.
Este es uno de los modelos más emblemáticos en USA y famoso por haber salido en alguna película como kill bill por ejemplo, además es uno de mis preferidos.Así que he buscado una hoja nueva de 112 arriesgándome a que no fuese compatible , por suerte para mí la hoja de las 112 actual es la misma que esta vieja que por el marcaje Buck he fechado 1974-1980.
Vamos con las fotos espero que os guste, ha sido sencillo pero valia la pena y a mi parecer el resultado es bueno, el marcaje no coincide con el mango pero ha quedado como nueva ,funcional 100% y bonita.
Saludos.
Categorías: Metalurgia, forja y fundicion
Bayoneta M9
Hola, buenos dias/tardes.
Acabo de terminar este cuchillo: Una bayoneta.
Especificaciones:
-Acero: 1095
-Largo total: 30 cm
-Largo de hoja: 18,1 cm
-Largo de empuñadura: 11,5
-Grosor: 4 mm
-Peso: 315 g
-Material de empuñadura: Guayubira blanco
-Guarda: 1095 (4mm)
-Pomo: 5160 (5mm)
Imágenes:
Esta vez me ha salido mucho mejor el acabado "Stone Wash". Anteriormente me habia salido mas rallado que punteado, cambié las piedras por unas mas grandes y use mas WD40. Creo que ese cambio resulto bien.
Ademas le hice 3 ciclos de baño con cloruro férrico, es decir, lo sumergí, lo limpie con virulana y repetí 2 veces más. Eso me dejo el color gris mas uniforme en toda la hoja.
La "sangradera" o Fuller fue algo complicado porque lo hice a pulso con la radial. Pero corregí muchos errores con un mini torno.
Me gustó hacer la empuñadura a partir de un taco de madera, claro que me hubiera gustado usar plastico negro, pero no tenía, así que lo tinté de negro con un tinte que compre en un super y listo.
De todas formas creo que puedo ponerle un grip de goma, como los que se ponen a los mangos de las paletas de padel para ensanchar el agarre y que tenga mejor "aderencia" a la mano.
Lo más descuidado es el pomo, colocando el remache de bronce no me percaté de que dañe el acero contra la prensa, pero lo limé un poco y quedo regular, por lo menos mejor que dejarle la marca.
Espero que les guste!
Categorías: Metalurgia, forja y fundicion
Squirrel,antigua navaja Rusa de los años 70
Buenas tardes,empezamos por la navaja:es más bien fea para que vamos a engañarnos... pero a mi me encantan estas navajas con historia detrás de ellas.Se trata de una navaja Rusa de los años 70-80, tiene las típicas virolas rusas circulares como tantos modelos de este país ,pero estas se hicieron famosas por sus cachas de vaquelita con forma de ardilla.Cayó en mis manos para la colección de navajas de todo el mundo pero antes merecia una limpieza de cara.
Esta vez era poco trabajo y mas bien fácil pero espero que os guste .Saludos.
Categorías: Metalurgia, forja y fundicion
How to Heat Treat Knife Steel in a Forge
Thanks to Mike Poutiatine, TWJC, Robert Hugh, Head VI, and Snackin for becoming Knife Steel Nerds Patreon supporters! I was able to purchase a forge to do these experiments with thanks to the contributions of supporters.
Video Version
The general information in this article also exists as a YouTube video for those that prefer to consume their information that way:
Importance of Prior Microstructure
In a previous article I wrote about how to normalize and anneal steel after forging but before the final steps of austenitizing, quenching, and tempering. One of the things that I pointed out in that article was that using a normalized, pearlite microstructure to heat treat from would lead to very rapid response to heat treatment. An annealed structure such as comes from the manufacturer takes more time, and higher temperature, to properly austenitize the steel. Below shows the resulting as-quenched hardness for 1084 and 52100 comparing normalized and annealed steel. These were all quenched from approximately where they became nonmagnetic (1385°F for 1084 and 1445°F for 52100), relatively low in temperature compared with the typically recommended temperature for heat treatment.
1084 hardness:
52100 hardness:
The high hardness after quenching 52100 from such a low temperature is impressive because of the relatively high chromium (1.5%) of the steel. Higher chromium delays transformations in the steel and typically 52100 is a steel that is thought to require higher temperatures and soak times. However, if starting from a pearlite structure it can be quenched from nonmagnetic and still be heat treated “properly.” This large difference in austenitizing response is also shown in the literature, such as in the study shown below comparing pearlite and spheroidized structures in 52100. You can see that the hardness is at its maximum in less than a minute with the pearlite structure while it takes over 2 hours to reach the same hardness with a spheroidized structure.
52100 steel austenitized at 840°C/1550°F, quenched in oil, and tempered at 175°C/350°F [1]
This occurs because the distance that diffusion occurs is much shorter with a pearlite structure then with a spheroidize annealed structure. See the simplified schematic below where the pearlite (lines indicating the cementite structure) vs spheroidized carbides (black circles) where you can see that the distance between those features is much greater with spheroidized cementite/carbides.
Pearlite (normalized)
Spheroidized carbide (annealed)
Heat Treating in a Forge
This is useful because typically when bladesmiths heat treat knives in a forge they are trying to get to a temperature at some point higher than nonmagnetic and this is a major source of variability. I figured if we use a normalized structure instead I could heat to nonmagnetic and quench without trying to reach a higher temperature that can’t easily be measured with a forge running at high temperature. There are various methods for heat treating in a forge such as using a muffle, or pipe, within the forge to help maintain a more even temperature distribution. However, I wanted to use the simplest method used by many beginning bladesmiths with a simple forge to heat the steel and checking for temperature with nothing but a magnet. If I could successfully heat treat in this way then I would have more confidence in recommending to people methods of how to heat treat with a forge. In the past I have always recommended against heat treating in a forge because a furnace is so much more controllable and consistent. However, I wanted to prove myself wrong in a sense by seeing if I could heat treat in a forge without any past experience with doing it.
I chose a range of different low alloy steels typically used by forging bladesmiths. I wanted to do different steels to make sure that the process worked with different carbon and alloy content. With each I overheated the steel at 2100°F/1150°C for an hour to simulate forging, normalized at 1550-1700°F for 10 minutes and air cooled. The normalizing temperature varied by steel. This was the condition that I used when heating to nonmagnetic in the forge and quenching in Parks 50. These were all 1/8″ pieces of steel.
Because of the different compositions of these steels the hardness of the normalized steel varied though I was able to cut all of them with a bandsaw and drill a small hole. A very high hardenability steel like L6 or thinner steel like 1/16″ may air harden enough where bandsaw cutting or drilling may be difficult.
Hardness of normalized steel
Magnetism and Heating Rate
The steel becomes nonmagnetic when it has transformed to austenite, a nonmagnetic phase of steel. There are certain steels, notably austenitic stainless steels, which are designed to be austenite at room temperature and are therefore nonmagnetic at room temperature. These are not used for knives but I am giving an example for better understanding of magnetic/nonmagnetic behavior. Fortunately for us with normalized pearlitic steel, it becomes nonmagnetic when the pearlite has been replaced with austenite and is ready for quenching. With annealed steel it will also become nonmagnetic when it has transformed to austenite, but the higher required temperature is to get more carbide to dissolve and to put more carbon and alloy in solution by dissolving those carbides. With the pearlite starting condition there is enough carbon in solution immediately after the pearlite has been replaced with austenite (see the previous chart of 52100 hardness vs time for pearlite and spheroidized carbide).
Different steels will transform to austenite at somewhat different temperatures but we don’t have to worry about that because we are checking with a magnet; when the steel has transformed we see that with the magnet. Another potential concern is that the transformation temperature can change based on how rapidly the steel is heated. Faster heating means the transformation is delayed to a somewhat higher temperature. Steel can heat relatively rapidly in a forge so the transformation may be shifted up a few degrees. However, we are checking with a magnet so once the steel has transformed we quench from there regardless of the temperature where that has actually happened. (Note: The dissolution of all of the carbide/cementite is not shown on the diagram.)
52100 transformation temperatures with continuous heating at different rates. Adapted from [2].
However, while with continuous heating the transformation is shifted up, if the steel is held at that temperature for a period of time the transformation will occur at a lower temperature. Therefore if the relatively fast heating of a forge leads to an increased temperature of transformation, attempting to hold the steel at that temperature may lead to the steel being overheated.
52100 transformation temperatures with holding at a constant temperature. Adapted from [2].
Dangers of Overheating
Grain Growth
Bladesmiths are generally familiar with the problem of grain growth with overheating. Larger grains in steel usually means reduced toughness. If the grain size is big enough the steel is brittle and will chip or break easily. This can be evaluated based on fracture appearance if the steel is broken in a brittle condition, ie as-quenched steel that isn’t tempered. Ductile steel that is fractured does not reflect the grain size of the steel, which is why normalized steel cannot be used to evaluate fracture grain. Below shows 1084 which was heated for 10 minutes, quenched, and broken.
1475°F (800°C)
1700°F (925°C)
2000°F (1095°C)
Carbon in Solution
However, grain growth is not the only danger of overheating. When too much carbide is dissolved putting excess carbon in solution toughness is reduced. Above about 0.6% carbon in solution the type of martensite starts to transition from “lath” to “plate” martensite. Plate martensite is brittle and prone to microcracks. A 1% carbon steel does not necessarily have 1% carbon in solution. The steel is generally austenitized at such a temperature where some carbon remains in carbides.
The arrow points to plate martensite within a matrix of primarily lath martensite [3]
Image from [4]
I also compared the toughness of low alloy knife steels in this article where I also used calculated carbon in solution to compare them. The trend was pretty convincing, showing how important this factor is for knife steel toughness, particularly in low alloy knife steel where carbon in solution is not as easily controlled as in high alloy steels.
Results of Forge Heat Treatments
So I heat treated these steels in an Atlas Forge with the propane set to very low pressure. This is still at relatively high temperature, approximately 2000°F/1095°C. I heated them up to a consistent temperature the best I could while occasionally checking with a magnet. When the steel was nonmagnetic I quenched in Parks 50. The samples were then tempered twice for 2 hours at 400°F/205°C. I tested the samples for hardness and also toughness using my standard unnotched subsize charpy specimens.
5160 and 8670
These steels are the lowest in carbon that I tested with these experiments. These steels are also among the highest toughness that I have tested, see the chart below for low alloy knife steels. I have separate articles about the heat treatment of these two steels:
In my forge heat treatments of 5160 and 8670 I measured similar hardness and toughness to the furnace heat treated specimens:
This indicates that the steel was both sufficiently heated (similar hardness to the furnace heat treated specimens) but not overheated (similar toughness). In furnace heat treatments of 5160 we found that when using temperatures of 1550°F or above the toughness was significantly reduced from grain growth. This gives a relatively wide window when forge heat treating between nonmagnetic and excessive grain growth when using normalized steel, as it becomes nonmagnetic at least 100°F below that point.
O1 and 1095
With the relatively low carbon content of 5160 and 8670, excessive carbon in solution is not as much of a potential problem with overheating. Instead we are primarily concerned about grain growth. However, with high carbon steel the effect of carbon in solution is much more significant. This is why the toughness of O1 and 1095 is so much lower than 5160/8670 in the low alloy steel toughness chart. Sometimes using reduced austenitizing temperatures with high carbon steels can result in improved toughness because of the reduction in carbon in solution (less carbide dissolved). See below where austenitizing O1 at 1475 and especially 1425°F resulted in superior toughness when compared with 1550°F even after compensating for hardness.
This was also an important topic when comparing the toughness of low alloy steels with a heat treatment for bainite, as bainite does not have the carbon in solution problem that plate martensite has. This resulted in higher toughness for O1 and 1095 with austempering treatments for bainite because of the elimination of plate martensite.
1475°F is the typical temperature recommended for furnace heat treating in these steels, so this is the comparison I made with the forge heat treated specimens. In this case the hardness was somewhat higher for my forge heat treated coupons but the hardness-toughness balance was similar to the 1475°F furnace heat treated coupons. So this is a good result I think.
52100
With 52100 the furnace heat treated coupons have significantly better toughness than furnace heat treated O1 and 1095. The chromium addition reduces the carbon in solution for a given austenitizing temperature and makes controlling the carbon in solution easier. This gives 52100 excellent toughness and wear resistance when compared with other high carbon low alloy steels. However, this is for furnace heat treating from a spheroidized annealed condition. When heat treating from pearlite you do not have the same control over the carbon in solution and the resulting as-quenched hardness, as shown below.
Chart adapted from [1]
However, 52100 would be the most difficult to heat treat in a forge from the spheroidized annealed condition because of how sluggish the dissolution of carbide is. And even if that was effectively done it would be difficult to target specific temperatures as with a furnace. So like with 1095 and O1 you are limited to relatively high hardness. You could temper higher than 400°F but then you would run into the issue of tempered martensite embrittlement where hardness is reduced but toughness also goes down. This was seen when heat treating 52100 with a 450°F tempering temperature, see this article on heat treating 52100 for more.
The toughness of the 52100 forge heat treated specimens was still good, with higher toughness than O1 and 1095. However, the toughness was somewhat worse than other high hardness furnace heat treated 52100. This may be because of greater carbon in solution from the pearlite starting microstructure. The other high hardness coupons from furnace heat treating used lower tempering temperatures (300°F/150°C) in combination with lower carbon in solution. However, as I said the properties are still reasonable and would do well for thin, high performance knives.
80CrV2 and 1084
I saved these two steels for last because they are in between the medium carbon (5160/8670) and high carbon (1095/O1/52100) categories described above. They therefore have behavior that is basically in between those two categories. 1084 is known as being very easy to heat treat in a forge because of its low alloy content and good hardenability (doesn’t have to be quenched as fast as 1095). Using a pearlite starting structure in all of the steels I have heat treated does somewhat remove the advantage 1084 has from the low alloy content, however, as all of these steels hardened from nonmagnetic just fine. Ironically, 1084 gave me the most trouble in heat treating because two of the coupons had lower toughness than the third. This was because I was having trouble heating the piece evenly and had a hot spot on one side of the steel, as shown in the image below, which is from video footage of me heat treating the specimens:
So to get the entire piece to reach nonmagnetic I ended up overheating those two hotter specimens resulting in grain growth and reduced toughness. This was also visible in the fracture grain of the specimens, though it was not as bad as you might think based on the reduction in toughness (remember these are only 10 mm wide):
This overheated treatment of 1084 would still result in an acceptable knife; there are many steel-heat treatment combinations used in common knives with lower toughness. However, we would of course prefer an optimized heat treatment rather a subpar one.
For 80CrV2 the toughness was somewhat lower than the furnace heat treated specimen. However, the hardness was also higher. So to have some idea of how it compared I overlaid the toughness of the furnace heat treated 1084 coupons since I don’t have a trend for 80CrV2. When viewed against the furnace heat treated 1084 the hardness-toughness-balance of the forge heat treated 80CrV2 looks pretty good.
Overall Trends
Because I heat treated from a pearlite microstructure rather than spheroidized annealed, and all of them were tempered at 400°F, the resulting hardness and toughness was primarily controlled by the carbon content of the steel, as shown below:
And then if we plot the hardness vs toughness balance you can better see where the different steels ended up in their overall properties:
So 5160 and 8670 would be best for knives requiring high toughness like heavy choppers. The medium carbon content gives them good hardness (58-60 Rc with a 400°F temper) without having significant issues with high carbon in solution and plate martensite.
1095, O1, and 52100 would be best for fine cutting knives like kitchen knives. Though 52100 did have better hardness and toughness than 1095 and O1 so it would be my choice. And 52100 has better edge retention than either of those steels.
1084 and 80CrV2 would be best for general purpose knives. Their medium-high carbon content gives them somewhat more hardness/strength and edge retention while still having very good toughness.
Should You Heat Treat in a Forge?
With furnace heat treating, however, you would have somewhat more control over the final properties of the steel and the steels would be more flexible in heat treatment for achieving different properties. 52100, for example, can have toughness as high as 1084/80CrV2 at similar hardness with the added benefit of more carbide for higher wear resistance. So with this type of forge heat treating the steel selection is very important for the type of knife that will be used, without being able to rely as much on changes to heat treatment. However, I did get decent properties with all of these steels with forge heat treatments, and these were the very first coupons I had ever heat treated in a forge. So can you get good results heat treating in a forge? Yes. I attribute this to the use of the normalized, pearlitic microstructure that meant I could quench from nonmagnetic without worrying about how much hotter to go.
The biggest dangers for forge heat treating are overheating for grain growth and excessive carbon in solution, as well as uneven heating leading to spots that are higher/lower in hardness or toughness. The problem of uneven heating can only be fixed with practice which is why I would still recommend that beginner knife makers send out knives to a professional heat treater if a furnace is not yet in the budget. Furnace heat treating is very easy and results in the same properties each time. You can follow recommendations from this website, datasheets, or my book Knife Engineering. Just follow the recommendations and the performance will be good even if you are a novice. The chances of screwing up a forge heat treatment are much higher. One example I gave in my last article was where a knifemaker sent me a whole range of different coupons heat treated in a forge, and he even used the muffle method with a thermocouple to try to have more even heating and more consistent temperature. The samples were obviously overheated according to the fracture appearance, and the toughness was very bad. So there are fewer guarantees with forge heat treatments.
Properly heat treated 52100 on the right and improperly heat treated 52100 on the left
High Alloy Steels and Stainless Steels
All of these examples were with low alloy steels generally used by forging bladesmiths. The method of heat treating normalized steel and checking with a magnet would not work for high alloy tool steels, high speed steels, stainless steels, etc. Basically any steel with 3% chromium or more. I have not attempted to heat treat any of those in a forge and the methods required to do so would be different.
Summary and Conclusions
My goal here was to prove to myself that good forge heat treatments can be done by a novice and that goal was achieved. There are still potential pitfalls to forge heat treating, with overheating and uneven heating being the most common. If you follow my recommendation to use a normalized, pearlitic microstructure, heat to nonmagnet and no hotter. It can be easy to heat significantly above nonmagnetic which will result in reduced toughness. I still recommend furnace heat treating or sending out to a professional heat treater for most people. That way you can have confidence in consistent, repeatable results. And furnace heat treating is just easier.
[1] Stickels, C. A. “Carbide refining heat treatments for 52100 bearing steel.” Metallurgical Transactions 5, no. 4 (1974): 865-874.
[2] Orlich, Jürgen, Adolf Rose, and Paul Wiest. Atlas zur Wärmebehandlung der Stähle;: Band 3: Zeit, Temperatur, Austentisierung, Schaubilder. Matplus GmbH, 1973.
[3] Samuels, Leonard Ernest. Light microscopy of carbon steels. Asm International, 1999.
[4] Krauss, George. Steels: processing, structure, and performance. Asm International, 2015.
The post How to Heat Treat Knife Steel in a Forge appeared first on Knife Steel Nerds.
Categorías: Metalurgia, forja y fundicion
Templar hojas largas
Saludos, Camaradas.
Tiene muchos años que no estoy activo en este gran foro, que considero mi escuela.
Ahora que volvi, tengo una duda que buscando en internet no he podido resolver.
Tengo una fragua pequeña de carbon con una fuente y una salida de aire. Funciona bien para hojas de no mas de 10cm que es lo que suelo forjar. Pero para una hoja mas larga de unos 16 a 20 ya es imposible obtener un calor uniforme en toda la hoja.
Mi plan es que en lugar de tener una salida, tenga dos, en forma de Y para que el aire salga uniforme en las dos. Lo que generaria dos puntos de calor y me permitiria alcanzar una temperatura uniforme en una hoja larga de unos 15 cm digamos, poco mas...
Quisiera mantenerme con fragua de carbon pues tengo ya años trabajando con ella y le tengo mucha confianza, ademas de que es mas barato.
Espero puedan ayudarme.
Categorías: Metalurgia, forja y fundicion
Inclasificable... + unos apuntes
Primero fué una idea loca, después un reto, ahora es una realidad.
Comencé con una hoja suelta de Joker pantera.
Son muchas imágenes, no os quiero aburrir, después comento lo que querais.
Secuencia de montaje.
.
Secuencia de apertura.
.
Algunas vistas.
Se trataba de realizar una navaja de estilo militar de mediados del XX con el conocido sistema de abanico o de secreto.
Para que no lo delate las conocidas rampas para los tetones (esta no lleva) el pomo es macizo y retractil, por eso el sistema de guia con muelle, que se encarga de bloquear el sistema en posición abierta y cerrada.
Todo está realizado con herramientas básicas, ni torno ni CNC, el tallaje interno de las cachas solo es posible con maderas duras o estabilizadas, palo rosa en este caso.
Es única por construcción o al menos a mi me lo parece, a ver que opinais, un gran saludo colegas.
PACO.
Categorías: Metalurgia, forja y fundicion
La "DAGA"
Hola amigos!En ocasiones se presentan trabajos en cierto modo especiales, por una cosa u otra o varias, y esta es una de ellas.Cuando un compañero de el mundillo del acero te dice "oye que quiero una navaja de las tuyas!" te sube la moral asta las nubes, y encima si es un tío co...nudo como @dagacuchillosartesanales ya es el copón! Pero vamos al tema que me voy por los cerros de Úbeda jejejeNavaja con bloqueo "hook lock" echa completamente en acero Sanmai Damasco inox con núcleo de vg10.Longitud total de 190mm de los cuales 80mm son de filo útil, un ancho de pala de 14mm y 3.5mm de espesor, cerrada mide 112mm.Funda simple en cuero, tintada y cosida a mano con hilo encerado rojo.Espero que os guste, y no dejéis de ver la página de @dagacuchillosartesanales y sus fantásticos trabajos!!
Categorías: Metalurgia, forja y fundicion
De lima a cuchillo
Hola!
Como se encuentran? Espero que bien.
No me extiendo... tal como mensiono en el titulo muestro los resultados:
Vídeo:
Enlace directo: https://www.youtube.com/watch?v=VmiX9xYPqQY&t=3s&ab_channel=LeandroGoretta
-Largo total: 18,4 cm (con estuche)
-Largo de hoja: 9 cm
-Largo de empuñadura: 8,5 cm
-Grosor: 3,5 mm
-Material de empuñadura: Madera de Lenga
Gracias por ver y buena semana.
Categorías: Metalurgia, forja y fundicion
Cachas custom para Victorinox con circuito impreso.
Buenas tardes , os queria enseñar un trabajito de un par de dias que he acabado hace un rato.
Se trata de dos pares de cachas para Victorinox , trabajadas con resina epoxi,explicaré los pasos pero con las fotos ya casi queda explicado. Espero que os gusten.
Saludos.
Marcar y cortar, como la placa que encontré era suficientemente grande dedidí hacer dos pares.
Preparadas para el baño de resina epoxi.He preferido poner el logo de Victorinox que he sacado de las cachas rojas así quedará inmerso en el epoxi.
Pasadas 15 horas el epoxi está el el punto de casi secado que me gusta para poder cortar y trabajar bien , pero que sepais que este epoxi en concreto no endurece del todo hasta las 24/48 horas, he dejado 1milimetro de epoxi por encima y por debajo del circuito.
Recortadas
Huecos para los remaches de los pasadores , canales del palillo y pinzas.
NOTA :Veo muchas cachas hechas a mano sin el hueco del palillo y pinzas supongo que por el trabajo extra y tedioso que supone hacer los canales ,para mí son dos herramientas imprescindibles y cueste lo que cueste tiene que llevarlas una vic por muy custom que sea.
Importante, lo que hace que queden bien las cachas es el corte ajustado pero sobretodo el pulido de los cantos biselados,para pulir los cantos con un disco de pelos de la dremell con pasta y a baja velocidad.
Y acabadas, no están puestas del todo solo presentadas ya que todavía no han llegado las dos victorinox que tendrán el placer de llevar estas cachas.
Categorías: Metalurgia, forja y fundicion
Proteccion contra el polvo, EPI.
Pues la pregunta es qué es lo que usais contra el polvo cuando teneis mucho que lijar???
Yo he pasado por diversas fases conforme ha ido subiendo mi actividad y os explico:
-no usar nada, con lo problemas consiguientes, mocos negros, lagrimeo oscuro y algún susto en forma de partícula a alta velocidad que impacta en el ojo.
-luego de las recomendaciones de mi Santa pasé a usar mascarillas fpp1 y gafas de estas antiimpactos, mejoraba el tema algo pero seguía moqueando serrín y en los ojos seguía entrando polvo.
-ahora mismo me tapo como una monja, bata, gorra, máscara de esas con filtros que parezco Darkvider y gafas de esas que ajustan en la cara y un aspirador acoplado debajo de donde estoi lijando.
El caso es que con esto último ha mejorado bastante pero sigo con molestias en las vías nasales aunque no tanto en los ojos. El caso es que lo de las gafas es un poema, se empañan cada dos por tres y el problema se acrecienta ya que desde hace un tiempo uso gafas para ver de cerca y no son compatibles con las de protección.
He usado por mi trabajo diferentes tipos de EPIs y a veces son un engorro y terminas muchas veces aparcándolos.
En Youtube he visto gente que usa una especie de snorquel con máscara completa y un cacharro atado a la cintura.
También mejorando la aspiración mejoraría el problema pero de momento eso no es posible.
Perdón por el tochazo pero es algo que me preocupa y creo que no es algo banal, el polvo fino puede llegar al torrente sanguineo y producir cancer entre otras enfermedades incluso por vía ocular.
Pues eso, que usais y/o me recomendais.
Un saludo.
Categorías: Metalurgia, forja y fundicion
Cuchillo para mi viejo
Hola a todos.
Este nuevo cuchillo lo hice para mi papá que es el cumpleaños dentro de poco.
Fué el trabajo mas rapido que hice, por que lo hice apurado pensando que no me iba a alcanzar el tiempo. Me tomó 1 semana.
Especificaciones:
-Punta: Recta
-Acero: 5160
-Largo total: 30,1 cm
-Largo de hoja: 18,6 cm
-Largo de empuñadura: 11,5 cm (con guarda)
-Grosor: 5 mm
-Material de empuñadura: Madera de Guayubira y pino con separadores plásticos
Imágenes:
El vídeo lo subiré cuando sea la fecha de cumpleaños, el 04/09.
Pero me adelanto con ustedes ya que el vídeo en realidad es más de lo mismo, lo que muestro habitualmente...
Espero que les haya gustado!
Hasta luego.
Categorías: Metalurgia, forja y fundicion
How to Thermal Cycle Knife Steel
Thanks to Jake Smith, Erik Mittag-Leffler, Ashley Wagner, David W. Debora Richards, gspam1, James Straub, Tim Ottawa, Flynn Sharp Knives, David Millington, Joseph Baier, Alex Roy, and Noah for becoming Knife Steel Nerds Patreon supporters! These experiments are very expensive and time consuming so your support is always appreciated.
Podcast Appearances
I appeared on two different podcasts since my last article. On Knife Junkie Podcast we discussed MagnaCut and a range of other topics.
On Mark of the Maker we discussed “Metallurgy Mythbusters” where we went over a bunch of different heat treating myths.
Video Version
I have a YouTube version of the following information in a video below. The content is somewhat different between the video and the article so you may like both.
Thermal Cycling
“Thermal cycling” is very non-specific, it just means heating and cooling steel. It probably isn’t specific enough for our purposes, but it is a common phrase used by knifemakers to refer to the steps they perform after forging but before the final heat treatment. The final heat treatment being the austenitize and quench for full hardness. Some knifemakers are also performing very non-specific cycling, however, with no clear purpose to what they are doing. Instead metallurgists perform specific cycles called normalizing and annealing. This sets up the steel to be soft for machining, drilling, cutting, etc. And for good heat treatment response for hardness, wear resistance, and toughness. Typically no “grain refinement” cycles are added though those are also very popular with bladesmiths so I have shown where they should go in the schematic diagrams below:
Grain Size after Forging
One change that occurs during forging is grain growth. Forging is typically done from very high temperature and with low alloy steels grain growth is very rapid in that temperature range. The amount (and speed) of deformation during forging a knife is not typically great enough to compensate for the effects of temperature. So after forging the grain size is typically relatively large. Here are example micrographs of a low carbon steel after being heated to different temperatures [1]. This steel actually has some micro-alloy added to it to help prevent grain growth so these grains are probably smaller than would be found in steels like 1095 after heating to the same temperatures.
920°C (1685°F) [1]
1000°C (1830°F) [1]
1150°C (2100°F) [1]
1300°C (2370°F) [1]
Another method for estimating grain size is looking at the “fracture grain.” If you break a piece of steel in a brittle condition the appearance of the fracture will correlate with its grain size. The steel must be brittle. Tempered steel and especially soft/annealed/normalized steel will break in a ductile fashion and the fracture will not correlate with the grain size. Below are example fractures from 1084 which were heated to different temperatures for 10 minutes, quenched, and then broken.
1475°F (800°C)
1700°F (925°C)
2000°F (1095°C)
A completely smooth specimen is given a fracture grain size rating of 10 and the coarsest possible appearance is given a rating of 1. This also correlates with ASTM grain sizes. A fracture rating of 10 is approximately equivalent to an ASTM grain size of 10. The ASTM grain size can be converted to an average grain diameter using charts that are available everywhere or by using the conversion equation. Below shows fracture grain size vs temperature for a range of different tool steels. The simple carbon steel W1 sees grain growth at relatively low temperature as you can see. Adding some alloy such as in O7 which has W, V, and Cr leads to less grain growth. A high alloy steel like D2 or T1 sees grain growth at much higher temperatures.
Image from [2]
Microstructure After Forging
The microstructure in terms of what phases are present can vary quite a bit after forging. Mixtures of pearlite, ferrite, austenite, martensite, and carbide can be found with different distributions depending on the forging process, steel, and how fast it was cooled after forging. Below shows the inconsistent microstructure found in O1 and L6 steels after forging.
O1 after forging [3]
L6 after forging [3]
Grain Boundary Carbides
Another issue that can happen with steels during forging is the formation of carbides along the grain boundaries. These are detrimental to toughness and we definitely want to eliminate them.
Carbides on grain boundaries [4]
Heating Up During Normalizing
So in normalizing we want to reduce the grain size from forging, achieve a consistent microstructure, and eliminate grain boundary carbide. While using low temperatures is best for fine grains, the most important thing we need to do is dissolve everything so we can eliminate the inconsistent microstructure and grain boundary carbide. The higher the carbon content, beyond 0.75% carbon, the higher the temperature required for dissolving all of the carbide.
Those are temperatures shown on top of the “equilibrium” phase diagram, meaning very long hold times. Since we will hold for 60 minutes or less for normalizing the actual temperatures we use will be higher to ensure the carbide is dissolved. While carbon is the most important element for dictating the normalizing temperature, other alloying elements can also affect the required temperature. One common one is chromium, which shifts up the required temperatures. This is why 52100 requires higher normalizing temperatures than other simple steels with similar carbon content.
Below shows schematic diagrams for what occurs during heating for normalizing, where first the ferrite/pearlite is dissolved and replaced with austenite, and then with higher temperature the last lingering carbides are dissolved.
Normalizing Temperatures
Below shows recommended temperatures for normalizing from my book Knife Engineering. For many of these you can actually normalize up to 100°F higher than this temperature to ensure everything is dissolved. Heat for 10-15 minutes and then air cool to normalize.
Cooling Down During Normalizing
After we have a microstructure of austenite we want to cool in air to form pearlite. This will leave us with a consistent microstructure going in to our next steps. Carbide and ferrite forms simultaneously on the austenite grain boundaries. Ferrite can accommodate almost no carbon, so the carbon leaves austenite by forming carbides. This creates carbon-lean regions where the ferrite can form. Therefore alternating bands of ferrite/carbide form which is a structure called pearlite.
Adapted from [5]
This same process occurs throughout the steel, with new pearlite grains nucleating at grain boundaries and growing to consume the austenite and replace it with pearlite.
Adapted from [6]
Different cooling rates lead to different hardness. A fast cooling rate leads to finer pearlite and higher hardness. A slow cooling rate leads to coarser pearlite and lower hardness. When air cooling you don’t necessarily have control over the cooling rate, but with thicker or thinner knives this will affect the cooling rate and the resulting microstructure and hardness.
Hardness of 1095 after normalizing with different cooling rates (generated from CCT curves)
1080 steel air cooled [7]
1080 steel furnace cooled [7]
With different steels the hardness of the pearlitic structure is also different depending on the hardenability of the steel. High hardenability steel like O1 will have a relatively high hardness and very fine pearlite. Low hardenability steel like 1095 is lower in hardness. If the O1 is very thin then some martensite may form. If the hardenability is very high like L6 or an air hardening steel then even more martensite forms. We prefer pearlite if possible with normalizing. Below are hardness measurements I made after air cooling 1/8″ stock knife steels:
Annealing
There are several different ways of annealing steel which I have previously covered in two articles: Part 1 and Part 2. But here I will give a brief summary of the different types. Generally what we are looking for is a “spheroidized” structure rather than pearlite. The round carbides are better for machining than pearlite. And the heat treating response is somewhat different.
Subcritical Anneal
If you heat the normalized steel and heat it to high temperature below austenite transformation and hold, it will spontaneously spheroidize. Below are images of 1080 steel being held at 1200°F (650°C) for different times [4].
Normalized [4]
4 hours [4]
16 hours [4]
64 hours [4]
240 hours [4]
360 hours (double magnification) [4]
Temper Anneal
A temper anneal is similar to a subcritical anneal in that you hold the steel just below the critical temperature to reduce hardness. The difference is that you heat the steel above critical and quench first. So it becomes a very high temperature temper to lead to low hardness steel and a carbide plus ferrite microstructure. Carbon precipitates out of the martensite and coarsens. Coarser carbide and less carbon in the martensite means lower hardness.
1084 tempering curve (ASM heat treater’s guide)
400°C (750°F) [4]
500°C (930°F) [4]
600°C (1100°F) [4]
700°C (1300°F) [4]
Transformation Anneal (Divorced Eutectoid Transformation)
The most common anneal is called a transformation anneal also called a divorced eutectoid transformation (DET) anneal. You heat above critical but not so high that you dissolve all of the carbides. And then during slow cooling the steel transforms to ferrite while growing the carbides by diffusing carbon to the carbides.
Image from [8]
The temperature of annealing is very important because if you heat to too high a temperature then too much carbide is dissolved. Without carbide it is more favorable for the steel to form pearlite. Below shows 1080 steel annealed from different temperatures.
1080 steel annealed from 1385°F (a), 1450°F (b), 1600°F (c), 1750°F (d). Image from [9].
Here are recommended annealing temperatures from Knife Engineering for a good DET anneal.
The cooling rate of the anneal is important to the final hardness and microstructure. Datasheets and steel manufacturers use very slow cooling rates that lead to a relatively coarse structure. This is the lowest hardness and most machinable structure. However, with a faster cooling rate the structure is finer which can have certain benefits. Below shows 52100 as-received compared with 52100 that I annealed by placing in vermiculite. You can use cooling rates at about 600°F/hr (300°C/hr) for most low alloy steels.
52100 steel as-received from the steel manufacturer (“slow” DET anneal)
52100 with “fast” DET anneal
Forge Heat Treating
One of the things I wanted to see is how much the prior microstructure affects the response to heat treatment. This is particularly important when heat treating without temperature control where you can’t easily do a soak at the appropriate temperature. The general recommendation to new knifemakers heat treating with a forge is to heat 100-150°F (50-80°C) higher than non-magnetic before quenching. Trying to heat some amount over non-magnetic leaves a lot to skill (and chance) and so I don’t like recommending to people that they perform forge heat treatments. Furthermore, one knifemaker once contacted me about testing 52100 that he had heat treated in a forge to look at different parameters and the toughness was horrible. The fracture grain was very coarse confirming they were overheated.
On the left is overaustenitized steel from the knifemaker heat treating with a forge. On the right is furnace heat treated 52100 with an appropriate austenitizing temperature.
The Experiment
But if the steel could be heated to non-magnetic and quenched for the appropriate microstructure without some unknown degree of heating beyond that, then we could remove a lot of the guesswork. The steel becomes non-magnetic when it has transformed to austenite. Read this article for more on checking steel with a magnet and what happens in the steel. I performed experiments with 52100 and 1084 from Alpha Knife Supply.
With both steels I overheated them at 2100°F (1150°C) for one hour and air cooled. Both were normalized, the 52100 at 1700°F (925°C) and the 1084 at 1550°F (845°C) for 15 minutes and air cooled. That is the normalized condition that I tested. I also tested them with a “fast DET” anneal where they were cooled at 600°F/hr (300°C/hr) after holding at 1450°F for 52100 and 1385°F for 1084, both for 15 minutes. Those temperatures are right about at non-magnetic. These were also compared to the as-received condition from the steel company which has a coarser microstructure as I originally stated.
1084 steel as-received (slow DET anneal). Coarse spheroidized carbides.
1084 normalized. Pearlite microstructure. The diagonal streaks are scratches because I struggled to get a good polish on these soft specimens.
1084 with fast DET anneal. There is some evidence of pearlite so it is probably good that the recommended annealing chart from Knife Engineering is at a slightly lower temperature of 1365°F.
Annealed 1084 showing the decarb layer where grains are visible. This isn’t exactly the same grain size as the rest of the structure because the transformations between carbide/pearlite and austenite also affect the grain size. However, it can provide some indication of the grain size of the bulk material. This is around a 9 ASTM grain size which is very fine. So the normalize and anneal was effective in refining the grain size after the high temperature grain growth treatment.
Quenching and Hardness Testing
I heated each steel to non-magnetic, which was about 1385°F for 1084 and 1445°F for 52100. I went up in 20°F increments until each became non-magnetic. I quenched each in Parks 50 and measured the hardness.
1084 had only 1 Rc difference in as-quenched hardness whether it was normalized for pearlite or heat treated from the as-received condition. It is a simple carbon steel so it is primarily carbon with some Mn and Si added. Carbon diffusion is very fast so even with a coarse spheroidized microstructure the final hardness is comparable.
1084 hardness hardness after quenching from just above non-magnetic:
52100, however, showed relatively significant differences between different prior microstructures. From the normalized condition it was a full 67 Rc after quenching. With the as-received microstructure it was only 60.6 Rc. The fast DET was in the middle though closer to the as-received than to the normalized condition. The chromium addition to 52100 delays the “kinetics” (speed) of the transformation.
52100 hardness after quenching from just above non-magnetic:
The coarse spheroidized structure leads to a relatively long distance that diffusion has to occur. Pearlite is a finer structure where transformation can occur more rapidly. Martensite (quenched steel) essentially has perfectly evenly distributed carbon. If you temper high enough and long enough you do get a structure that starts to look more like a fast DET anneal, however.
Spheroidized carbide schematic
Schematic of pearlite
Schematic of quenched martensite
Effect of Prior Microstructure on 52100 Toughness
In a previous experiment with 52100 steel we found a significant difference in toughness between steel heat treated from the as-received condition and the “fast DET” annealed condition. The finer resulting microstructure apparently increased toughness. However, the hardness of the steel from the as-received condition is 1-2 Rc lower than I would expect. Perhaps the steel was particularly coarse from the manufacturer. Read more about these experiments in this article on heat treating 52100.
Effect of Prior Microstructure on CruForgeV Toughness
We also did a series of experiments on a few years ago with CruForgeV which you can read about in this article. To that set of experiments I added a toughness test from the as-received condition to go with it in the past couple weeks for this article. In the original experiment the steel was forged between 1550°F/845°C and 2000°F/1100°C (the effect of forging temperature was one of the tests performed). Each was normalized from 1600°F/870°C. Then they were given three different anneals:
Subcritical anneal: 1250°F/675°C for 2.5 hours. I don’t think this was long enough for significant spheroidization so it was probably mostly pearlite.
Temper anneal: 1450°F (785°C) for 10 minutes, quench, then 1250°F for 2.5 hours.
Fast DET anneal: 1460°F for 30 minutes followed by 670°F/hr (375°C/hr).
The hardness after 1500°F for 10 minutes, Parks 50 quench, and temper at 400°F is shown below:
Then below is the resulting toughness for the different conditions. This also includes other heat treatments with the fast DET condition to show the overall trends of hardness vs toughness:
So the overall toughness-hardness balance was not really affected by the different prior processing but the finer microstructure anneals did lead to higher hardness as expected. However, the prior microstructure does change the optimal austenitizing temperature range. The datasheet for CruForgeV recommends 1500-1550°F. However, using 1450°F with the fast DET led to similar hardness-toughness to using 1500°F with the as-received condition. And using 1550°F with the fast DET prior microstructure led to terrible toughness. So having the finer microstructure of the fast DET led to a drop of about 50°F in the optimal austenitizing temperature range.
Choosing Between Normalized and Annealed Steel for Final Heat Treatment
One reason that I prefer the fast DET rather than a subcritical anneal, temper anneal, or normalized structure is because of the difference in heat treatment response. When you have control over temperature with a furnace there is a range of hardness and microstructure that you can choose between. But with a pearlitic or martensitic starting microstructure you are basically limited to high hardness. Tempering higher to bring the hardness down would lead to issues with tempered martensite embrittlement. However, as I said before when heat treating in a forge the benefits of pearlite not requiring a soak is probably more useful. See the chart below for 52100:
Adapted from [10]
Cycling for Grain Refinement
As discussed previously in this article, grain refining cycles can be performed in between normalizing and annealing. This is like a normalizing cycle but is done from a lower temperature, such as 1400-1450°F. Cycling from low temperature has been shown to lead to finer grain size such as in the 1060 steel below which was cycled from 1490°F (810°C) [11]:
Overheated at 2000°F/1100°C (a), 1-cycle (b), 3-cycles (c), 5 cycles (d), 8 cycles (e). Image from [11].
Effect of Cycling on Carbide Structure
However, grain refinement is not the only change to the microstructure. This cycling treatment with the 1060 also led to spheroidization of the carbide. After several cycles the microstructure looked pretty close to a fast DET structure.
One cycle (top), 5 cycles (middle), 8 cycles (bottom). Images from [11].
Effect of “Grain Refining” Cycles on Heat Treatment Response
So while I think a pearlite structure is best for a forge heat treatment perhaps we would want to add a grain refining cycle or two to help with the grain size. In my previous 52100 samples I also tried a grain refining cycle from 1445°F after normalizing and compared the hardness to see if there was a difference:
The hardness was somewhat reduced when compared with the original normalized steel. To determine why I looked at the microstructure and found that the steel had partially spheroidized even after only one “grain refining” cycle:
Effect of “Grain Refining” Cycles on 1084 Toughness
I did a set of experiments on 1084 with different prior processing to see if grain refining cycles can improve toughness. For each I heated them to 1475°F for 10 minutes, quenched in Parks 50, and tempered at 400°F/205°C. For one condition I used the steel “as-received” from the steel company. In the other two I overheated both at 2100°F for an hour to simulate grain growth from forging. In one I annealed from 1380°F with no normalizing or grain refining. In the other I normalized from 1550°F, then did two grain refining cycles from 1450°F, and finally ended with the same anneal as the other specimen. The hardness was a point higher on the two specimens that I annealed because of the finer microstructure from the fast anneal. However, the toughness was no different whether I did the grain refining cycles or not. The fracture grain of all of the specimens was fine so it could be that there was no difference as long as the final austenitize was done correctly. Or perhaps the anneal leading to a fine distribution of carbides in combination with a fine grain size meant that the prior normalizing and grain refining had no benefit.
1084 steel overheated and annealed prior to austenitizing
1084 steel overheated, normalized, “grain refined” and austenitized
I still recommend normalizing as that is for the purpose of dissolving everything and having a consistent pearlite microstructure. However, it appears that adding extra grain refining cycles is not necessary for a fine grain size, and led to no improvement in toughness.
Stress Relieving
Another type of heat treatment that can be performed prior to the final austenitize is a “stress relief” treatment. This one is commonly done because of stresses induced in the steel during grinding the annealed steel. If the steel is significantly heated in different portions from grinding this can lead to increased chances of warping or cracking during austenitizing and quenching. A stress relief is typically done from 1200°F/650°C for 2 hours.
Thermal Cycling for Stock Removal?
It is relatively common for knifemakers to do various cycling treatments with low alloy steels even for knives that have not been forged (ie stock removal knives). They typically do this with the goal of grain refinement. However, as shown in the above experiments, the changes to the carbide structure and heat treatment response are much more significant than any changes to grain size. If you are forging some knives and doing stock removal with others, I recommend doing the same set of normalizing and annealing treatments to keep the heat treatments consistent. Otherwise some knives will have different hardness, toughness, etc. If you have a furnace where you can control austenitizing temperature and soak time then the steel is probably fine from the manufacturer. If you are heat treating without temperature control in a forge then it may be better to start with a pearlitic structure from normalizing.
Thermal Cycling Stainless?
Stainless steels and high alloy tool steels cannot be normalized. Most of the steels used in knives still have significant carbide all the way up to melting temperature. So the carbides cannot be dissolved as with low alloy steels. And during air cooling you will get martensite rather than pearlite because of the high hardenability. And as shown in charts earlier in this article, grain size stays fine during forging much better in high alloy steels because all of the carbides “pin” the boundaries preventing grain growth.
If you are forging stainless or high alloy tool steels you should simply anneal instead. You can do a standard datasheet anneal which is a slow transformation anneal. I have not seen research on faster anneals on these types of steels and the rates are likely significantly slower than in low alloy steels so I would probably stick with the datasheet rather than attempting a “fast DET” like I recommend with the low alloy steels. However, one alternative is a temper anneal. The required temperatures and times are significantly higher than low alloy steels but experiments on T1, M1, and M2 high speed steels found an improvement in grain size after the final austenitize and quench if done in a specific way. Read more in this article or in Knife Engineering.
How to “Thermal Cycle” Low Alloy Steels in a Forge
1) Normalize by heating to the approximate recommended temperature and air cool.
Determining the exact temperature can be done by color or maybe with a laser thermometer. My cheap laser thermometer is always way off so I don’t know if more expensive ones can do better. Fortunately normalizing can be done from a relatively wide range of temperature. When the steel is fully magnetic again during air cooling it is done transforming. If heat treating in a forge this is the best microstructure going in to austenitizing because no soak is required.
2) Heat to non-magnetic (and no higher) and then place in vermiculite. This step is recommended if your final austenitize and quench will be done in a furnace.
While it might sound funny to do normalizing and annealing with a forge if you have a furnace, the cycles can be done very rapidly in the forge so it can be more convenient.
How to “Thermal Cycle” in a Furnace
1) Normalize by heating to the recommended temperature for 10-15 minutes and air cool.
2) Anneal by heating to the recommended temperature for 15-30 minutes, cool at 600°F/hr (300°C/hr) to 1100°F. After 1100°F the steel can be furnace cooled or air cooled it doesn’t matter.
Summary and Conclusions
There are a lot of different recommendations for different cycles to perform after forging but those recipes sometimes miss what it is we are trying to achieve with normalizing and annealing. Normalizing is to dissolve everything and have a consistent microstructure. Annealing is to give a spheroidized structure which is easily machinable and easily cut and drilled, and to have consistent final heat treatment response. Grain refining cycles don’t seem to provide any benefits beyond a normalize and anneal in the experiments that I performed. When performing a final heat treatment in the forge there are benefits to having a normalized structure rather than annealing because the heat treatment response is so rapid. That means you can heat to non-magnetic without going hotter and quench from there. I will next be doing experiments with forge heat treatments with a normalized structure in a range of steels to see how well this works for a forge heat treating beginner like me.
[1] Souza, Samuel da Silva de, Paulo Sérgio Moreira, and Geraldo Lúcio de Faria. “Austenitizing Temperature and Cooling Rate Effects on the Martensitic Transformation in a Microalloyed-Steel.” Materials Research 23 (2020).
[2] Roberts, George Adam, Richard Kennedy, and George Krauss. Tool steels. ASM international, 1998.
[3] http://www.georgevandervoort.com/images/met_papers/IronandSteel/ToolSteels_Longest.pdf
[4] Samuels, Leonard Ernest. Light microscopy of carbon steels. Asm International, 1999.
[5] Porter, David A., and Kenneth E. Easterling. Phase transformations in metals and alloys (revised reprint). CRC press, 2009.
[6] Brooks, Charlie R. Principles of the heat treatment of plain carbon and low alloy steels. ASM international, 1996.
[7] Toribio, Jesús, Beatriz González, Juan-Carlos Matos, and Francisco-Javier Ayaso. “Influence of microstructure on strength and ductility in fully pearlitic steels.” Metals 6, no. 12 (2016): 318.
[8] Verhoeven, J. D., and E. D. Gibson. “The divorced eutectoid transformation in steel.” Metallurgical and Materials Transactions A 29, no. 4 (1998): 1181-1189.
[9] Payson, Peter. The annealing of steel. Crucible steel company of America, 1943.
[10] Stickels, C. A. “Carbide refining heat treatments for 52100 bearing steel.” Metallurgical Transactions 5, no. 4 (1974): 865-874.
[11] Saha, Atanu, Dipak Kumar Mondal, and Joydeep Maity. “Effect of cyclic heat treatment on microstructure and mechanical properties of 0.6 wt% carbon steel.” Materials Science and Engineering: A 527, no. 16-17 (2010): 4001-4007.
The post How to Thermal Cycle Knife Steel appeared first on Knife Steel Nerds.
Categorías: Metalurgia, forja y fundicion
Tres ultimas navajas
Hola amigos!
Os muestro las tres ultimas piezas que he echo recientemente, espero que os gusten!
"Scramasax soul"Navaja con sistema de bloqueo integral tipo "hook lock" con hoja inspirada en scramasax, en acero N690co tanto la hoja como el cuerpo.Con un longitud total de 197mm, un filo útil de 75mm, un ancho de pala de 25mm y espesor de hoja de 4mm.Cerrada mide 128mm y 9mm de espesor, y un peso de 130gr.Cuerpo acabado satinado (ideal para hacerle un buen grabado) y hoja pulida a espejo, que le da un atractivo contraste."Dark Soul"Navaja de fricción en acero N690co y asta de búfalo.Esta navaja es prima hermana de la Scramasax soul, misma hoja pero distinto acabado en empuñadura.Pero las dos igual de cortadoras Hoja con filo útil de 75mm, un ancho de pala de 25mm y espesor de hoja de 4mm.Navaja liner lock "Sherman"Navaja con bloqueo liner lock, realizada en acero bohler N690co para la hoja y la costilla y 420 para los forros, y cachas en asta de búfalo.En este caso, el nombre en referencia al conocido tanke americano Sherman, por qué está navaja es un auténtico tanke jejeje200mm de longitud total, de los cuales 80mm son de hoja, un ancho de pala de 31mm y 4mm de espesor.
Categorías: Metalurgia, forja y fundicion
Orfebres famosos
La orfebrería ha sido un trampolín para muchos tipos diferentes de arte: la historia de la pintura y la escultura, por ejemplo, está llena de ejemplos de artistas famosos que se formaron por primera vez como orfebres o plateros. Incluyen luminarias del Renacimiento como Lorenzo Ghiberti (1380-1455), el escultor del Renacimiento; Luca Della Robbia (1399-1482), conocido por su escultura de terracota ; Vecchietta (1410-80), el pintor y arquitecto de Siena; Antonio del Pollaiolo (1429-98), el escultor del quattrocento; Andrea del Verrocchio(1435-88), el escultor Medici que enseñó a Leonardo; el devoto florentino Sandro Botticelli (1445-1510); el pintor de frescos Domenico Ghirlandaio (1449-94); el grabador Cristofano Robetta (1462-1535); el escultor paduano Andrea Riccio (1470-1532); el artista del Alto Renacimiento Andrea del Sarto (1486-1530), el pintor manierista Agnolo Bronzino (1503-1572), el escultor florentino Benvenuto Cellini(1500-71); el grabador e impresor alemán Johannes Gutenberg (1395-1468), el artista Albrecht Durer el Viejo (1427-1502), padre del pintor del Renacimiento del Norte Albrecht Durer; el grabador renacentista francés Jean Duvet (1485-1562), el pintor y grabador renacentista suizo Urs Graf (1485-1528) y el destacado miniaturista inglés Nicholas Hilliard (1547-1619), por nombrar solo algunos.
BENVENUTO CELLINI
BENVENUTO CELLINI
Cabe mencionar a los grandes maestros orfebres rusos del siglo XIX, como Andrey Grigoriev, Ivan Gubkin, Sakerdon Skripitsyn e Ivan Zuyev. Además, fíjese en los "artistas-joyeros" Gustav Fabergé (1814-1893) y Peter Carl Fabergé (1846-1920), creadores de los exquisitos "Huevos de Pascua de Fabergé" para los zares Romanov. Entre los muchos artesanos de Fabergé involucrados en los diversos procesos de orfebrería, además de los joyeros Michael Perchin (1860-1903) y Henrik Wigstrom (1862-1923), se encontraban Erik August Kollin (1836-1901), Feodor Ruckert (1840-1917)., August Frederik Hollming (1854-1915), Johannes Zehngraf (1857-1908), Johan Victor Aarne (1863-1934), Feodor Alexeievich Afanasiev (1870-1937), Karl Gustaf Hjalmar Armfeldt (1873-1959), Oskar Woldemar Pihl (1860-97), Vassily Zuiev (1878-1941).
Escrito por: Alejandro Glade R.
Categorías: Metalurgia, forja y fundicion
Estilos de ajuste de piedra
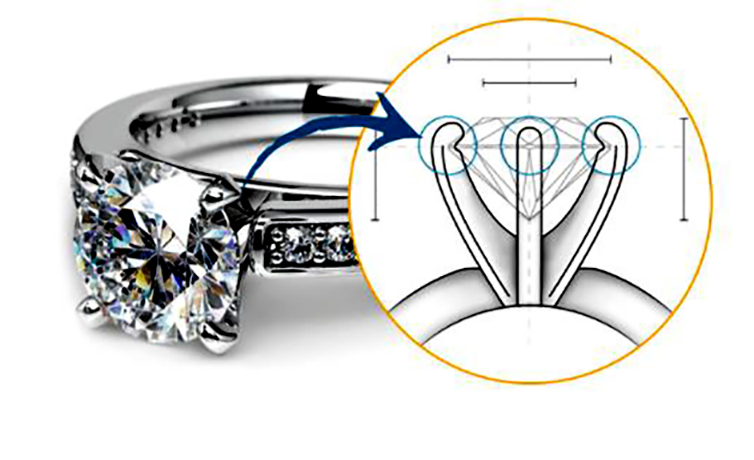
Ajuste de la Grifa
La configuración de anillo más comúnmente disponible se llama configuración de Grifa. Lleva una punta que es una pequeña garra de metal que sostiene el diamante u otra piedra en su lugar. Los dientes pueden ser redondeados, puntiagudos, planos o en forma de V.
La mayoría de las configuraciones de Grifas cuentan con cuatro o seis Grifas; con el primero se puede ver más la piedra, siendo el segundo más seguro.
Una ventaja de este engaste es que hay una presencia mínima de metal, de modo que hay más gema para ver y más luz que puede pasar a través de la gema, lo que aumenta su brillo.
Ajuste de bisel
La configuración de bisel es la segunda configuración de anillo más popular. En lugar de sujetar la gema con puntas, el engaste del bisel rodea la gema, o la piedra central, con un borde de metal delgado diseñado para sujetar la piedra firmemente en su lugar.
Un engaste de bisel puede ser total o parcial: un bisel completo rodea completamente la gema, mientras que un bisel parcial deja los lados abiertos.
Es una buena opción para quienes buscan un anillo que no se enganche y que proteja adecuadamente a la gema.
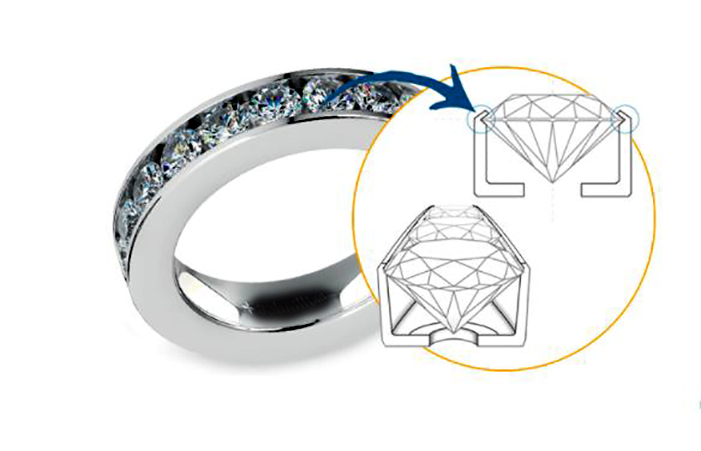
Ajuste de canal
El estilo de engaste de canal es una forma segura de colocar piedras más pequeñas en una fila en la banda del anillo, creando un canal de piedras al ras con el anillo. Dado que las piedras no están elevadas, hay menos posibilidades de que se dañen o se pierdan.
Las piedras se colocan muy juntas en la ranura del canal y decoran los lados de la banda o toda la banda.
Este entorno es popular para los anillos de boda que solo tienen piedras más pequeñas y no tienen una piedra central.
Escrito por: Alejandro Glade R.
Categorías: Metalurgia, forja y fundicion
Páginas

Custom Search